Whoa. It’s been three months since we last posted - that's practically an eternity. In that amount of time, Kathryn and I started senior year, turned 22 and 21 respectively, have been asked about our post-grad plans about 182938109284039248 different times, and most importantly, witnessed the election of Barak Obama – I’m definitely still feeling the post-election glow.
Because patience should always be rewarded, I offer all of our devoted readers out there a truly fabulous recipe for Chocolate Beet Cake. I made this over fall break, when I went on an Alt-Break service trip with other Grinnellians to Community Homestead, which is an intentional community and organic farming operation for families and people with special needs. It was a locavore's dream vacation. In exchange for our work on the farm, we got to eat many a vegetable soup, made with freshly harvested produce, drank raw milk from their dairy barn, and ravenously consumed the homemade cookies and bread from their certified organic bakery. Being a part of this community and seeing the physical labor of food production really made me appreciate the sacredness of food, something that is often missing from my mind when I go shopping at the super market.
We also got to take part in their weekly potluck supper, and we brought over the aforementioned beet cake, and we got to use some of the beets that we had harvested earlier in the week. Here it is:
Bringing a cake made out of beets gets you some serious farm-cred at a country potluck - we even upped the anty by coloring our frosting and a powdered sugar glaze with the leftover beet roasting liquid and carved an extra beet into a shape of a heart and stuck it in the center of the bundt. As for the cake itself, the beets lend a really subtle earthy flavor to the chocolate and give it a supremely moist texture. Not only a conversation piece and way to use up the last of your autumnal root vegetables, I swear you will enjoy the cake for its pure and simple flavors. Enjoy.
Chocolate Beet Cake with Cream Cheese Frosting
Adapted from Washington Post June 7, 2006
Ingredients:
* 3 medium beets
* 1 cup vegetable oil
* 1 1/2 cups flour
* 1/2 cup whole-wheat flour or pastry flour
* 2 teaspoons baking soda
* 1/4 teaspoon salt
* 4 tablespoons butter
* 3/4 cup cocoa powder
* 3 large eggs
* 1 3/4 cups sugar
* 1 tablespoon vanilla extract
* confectioners' sugar (optional)
Preheat oven to 400 degrees. Wash the beets and put them in a roasting pan and add 1/2 cup water. Cover and put in the oven for 45 minutes to an hour, until approximately fork tender. Reserve the juice from the beet pan and set aside. Peel and coarsely chop the beets, and then puree them in a blender with the oil. Set aside.
Reduce the oven temperature to 375 degrees. Lightly coat a bundt pan with butter and dust with either flour or cocoa powder. In a medium bowl, stir the flours, baking sode, and salt. Set Aside.
In a microwave safe bowl, melt the butter and cocoa powder together in the microwave, making sure to stir the mixture at least every minute to make sure that the butter doesn't burn. Once the mixture is smooth, set aside.
With a hand-held, stand mixture, or good old fashioned egg beaters, combine the eggs and sugar in large bowl, and beat until the eggs are fluffy and change to a pale yellow color. Slowly incorporate the beet puree, the chocolate mixture, and the vanilla. Gently fold in the flour mixture until it is just mixed in. Pour the batter in the pan, and bake for 45 minutes, or until a toothpick inserted near the center comes out clean. Set aside, and let it cool. Meanwhile, make the frosting.
Cream Cheese Frosting
Adapted from March 2008 Bon Appetit
Ingredients:
* 8 ounces cream cheese, room temperature
* 2 cups powdered sugar
* 1/4 cup (1/2 stick) unsalted butter, room temperatur
* 1/2 teaspoon vanilla extract
* reserve beet roasting liquid (optional)
Combine all ingredients except for the beet roasting liquid. Add the reserve beet roasting liquid in tsp increments until the frosting becomes an appealing shade of salmon pink. Frost the cake, and serve.
Happy Cooking,
Allison
Monday, November 10, 2008
Friday, July 25, 2008
Pocketful of Peach Drop Cookies
Hey Kathryn,
Many strange things happened. I have had not one, but two whole days off from work this week, and the high yesterday in Iowa City was 65 and complete with cloudy skies and a chance of thunderstorms. Though it was not quite idyllic weather for RAGBRAI (the week long bike across Iowa), the odds could not have been better for summer baking, which is usually so nonsensical.
Also, I stumbled upon this great peach drop cookie recipe from the domestic guru herself, Martha Stewart, and unlike her public persona, they are not at all stuffy. They are a cross between a scone and a snickerdoodle, having both a chewy consistency along with a mildly spiced topping.
Look at how pretty they are with the flecks of purple peach skins! I didn't think of this before, but they would be excellent with chopped crystallized ginger.
They are also best eaten the first day, so invite some friends over, make some peach iced tea, and have a porch party.
Adapted From Aug 2007 Issue of Martha Stewart Living
Ingredients:
2 cups flour
3/4 tsp salt
1/2 tsp baking soda
1 stick of butter at room temperature
1 cup granulated sugar plus 2 tbsp granulated sugar
1 egg at room temperature
1/2 tsp vanilla extract
2 large ripe peaches, diced into 1/4 inch pieces
1/2 cup peach jam
1/4 tsp ground cinnamon
Directions:
Preheat oven to 375, and dot the corners of a baking sheet with butter and place on top a sheet parchment paper or wax paper.
In a small bowl, mix together the flour, baking soda, and salt, and set aside. In a large bowl, stir the stick of butter until fluffy, and then add a cup of sugar. Cream the mixture until the sugar is well incorporated into the butter and is no longer grainy. Add the egg and vanilla and stir until well combined. Add the flour mixture, and stir (don't worry if the dough is clumpy at this stage). Add the peach jam and diced peaches and blend just until well combined.
In another small bowl, combine the remaining sugar and cinnamon and set aside. Use a tablespoon sized spoon and scoop the cookie dough onto the baking sheets. Sprinkle the tops with the cinnamon sugar mixture, and place in the oven. Bake until the edges are just golden brown, about 11 to 13 minutes. Let them cool in the pan for five minutes, and then transfer them to a cooling rack.
Makes about 3 dozen cookies.
Enjoy! Good luck with your article for Urban Tulsa. See you in less than a month!
Allison
Tuesday, July 8, 2008
You say sei-tan, i say sei-ton
Hey Kathryn,
How're you? I can't believe that it's Friday already, one whole week after the 4th, when I actually made this new recipe. I didn't do the conventional 4th of July BBQ this year - there was a Jazz Festival in Iowa City, and I got me some fried oreos instead. They didn't quite match my expectations - the chocolate wafers were a little too soggy from all of the batter and frying - but you only live once, right?
However, I still had the urge to cook something equally revolutionary, and then it crossed my mind that we've had this blog for over seven months, and we have very few posts devoted to vegetarian proteins like tofu, tempeh, and probably the most mysterious one, seitan. I wish that I had discovered seitan when I first became a vegetarian, and was really craving meat. Seitan is made from gluten, the protein in flour. In color and in texture, it vaguely resembles liver, and since it is vegetarian, it is way less creepy to eat than the meat-version. It is delicious on its own, eaten with some homemade broth, or put into curries, taco-fillings, etc. If you haven't tried it before, I would recommend ordering it at a restaurant first so you can see if you like it (for all of those in Iowa City, go to Thai Flavors, and order it in the Green Curry).
Once you've discovered that you can't live without seitan, you can either continue ordering it at restaurants, buying it at the store, or you can make your own! I kid you not, it's easier than making pie. All you really have to do is make the dough, knead it,
It makes quite the homey meal, served with the homemade stock and some noodles. Also, do you remember gak, that rubbery playdough? Because the seitan dough totally resembles it, so you can only imagine how much fun it is to work with it and knead it.
Adapted from Veganomicon by Isa Chandra Moskowitz and Terry Hope Romero
Braising Broth:
2 tbsp vegetable oil
3 onions, roughly chopped
3 garlic cloves, kept whole
1 tsp dried thyme
salt and pepper
1 quart of water
1/4 - 1/3 cup soy sauce
Heat the oil in a stock pot on medium heat, and add the onions and garlic. Cook the onions and garlic until they start to caramelize and brown along the edges. Add thyme and salt and pepper and continue cooking until the onions are a golden brown all over. Add the water and the soy sauce and stir to incorporate the browned bits from the bottom into the stock. Watch the pot and once it comes to a boil, cover and simmer for at least 25 minutes. In the meantime, make the seitan.
1 cup Vital Wheat Gluten Flour
3 tbsp nutritional yeast
1/2 cup cold vegetable broth
1/4 cup soy sauce
1 tbsp olive oil
2 garlic cloves either finely minced or pressed
Combine the gluten with the nutritional yeast in a medium sized bowl, and combine the rest of the ingredients in a small size bowl. Create a well in the gluten mixture bowl and pour in the wet mixture. Stir until the mixture comes together in a dough-like ball, and knead with a spoon along the sides of the bowl for about 2 minutes. Divide the dough into three parts, and knead and stretch each of them in your hands for about 3 minutes.
Once the stock has come to slow simmer, drop the seitan balls in the liquid, cook them in the covered pot for about an hour.
To store the seitan, put in a reusable container along with the extra broth to make sure that the seitan stays moist.
Good luck with everything, and stay cool in scorching Oklahoma
Love,
Allison
Thursday, June 19, 2008
I survived the flood of 08'
Hey Kathryn,
As far as cooking goes - I've been in quite the frugal mode, ie, trying to make as many things as possible without having to go to the store. Some projects have been really successful, such as this pesto I made with arugula, parmesan cheese, almonds, garlic, lemon juice, salt, and a combination of olive and truffle oil (I know, this hardly qualifies as a frugal ingredient, but I've been trying to find as many applications for it as possible before it becomes rancid.) I don't have any pictures of it, but it was rustic and sufficiently garlicky. If I were a recipe developer for Gourmet Magazine, I would use it as a base for a grilled pizza topped with smoked mozzarella and peaches.
It seems like you've been mighty busy over the past week. I've definitely tried to decompress over the past couple of days - I've had some time off, and it finally appears that this flood is on the mend. Yesterday, the water receded 10 inches, and more roads are starting to open up. It is now safe to cross the river and venture over to the Iowa City downtown area (yay! Farmer's Market, here I come!)
I don't have any pictures of the flood, but I do have this fairly biblical/ironic/mundane photo of a rainbow framing my neighbor's home that I took last Saturday when the Iowa River rose to around 30 feet, which is 8 feet above the 93' levels.
As far as cooking goes - I've been in quite the frugal mode, ie, trying to make as many things as possible without having to go to the store. Some projects have been really successful, such as this pesto I made with arugula, parmesan cheese, almonds, garlic, lemon juice, salt, and a combination of olive and truffle oil (I know, this hardly qualifies as a frugal ingredient, but I've been trying to find as many applications for it as possible before it becomes rancid.) I don't have any pictures of it, but it was rustic and sufficiently garlicky. If I were a recipe developer for Gourmet Magazine, I would use it as a base for a grilled pizza topped with smoked mozzarella and peaches.
However, I found that improvisation can be a bit more complicated when trying to make pancakes. Marci and I attempted to make pancakes with a recipe that called for 1/2 a cup of plain yogurt. After discovering that the only non-gelatin containing yogurt we had in the fridge had expired a month ago, I thought we could use a combination of ricotta cheese and buttermilk. Due to this decision and the addition of a few too many frozen blueberries, the batter was a Bridget-Jones-cooking-disaster shade of blue and a little too watery. The batter would flood onto the griddle, which produced really haphazardly shaped pancakes such as these ones.
Bio-major Marci called it "imperfect mitosis."
As hard as they were to spoon on to the pan, they were even harder to flip. We agreed to equally distribute the more perfect ones and the "screw-up" pancakes, but as you compare the two stacks, you can clearly see that Marci who was on flip-duty has a relaxed definition of sharing. Just teasing...
However, even though these pancakes were mushy, not fluffy, blue, not golden brown, amoeba shaped, not round, Marci and I still cleaned them off. The real moral of the story is that there isn't anything in life that can't be fixed with a dollop of ricotta cheese and good old Canadian maple syrup.
Missing you, and I hope that you find more great recipes from the Splendid Table cookbook.
Allison
PS - Marci and I had the greatest idea ever for a breakfast party in Grinnell. It'll be an ode to the character Letitia Cropley on Vicar of Dibley and the game will be called Surprise Ingredient Pancakes. What do you think?
Tuesday, June 17, 2008
One More Post
I know I've been a posting fiend lately, but I just have to tell you about the dinner I just made. Well, actually, it was boring except for the main dish. I don't have any pretty pictures (because the tofu got eaten up too quickly), but here's what I did:
First I marinated the tofu (extra firm, drained of liquid, cut into 1/2-inch-thick slices) for 10 minutes in a mixture of teriyaki sauce, sesame oil, apricot preserves, honey, dijon mustard and chile powder (because, if we've learned anything in the past six months, it's that dijon mustard makes everything better). Then I fried the tofu in more sesame oil (over medium-low heat, about 5 minutes to a side), poured the oil off, added the remaining marinade, and sauteed the tofu in the marinade/sauce for a couple more minutes.
We ate this over plain old rice, but it would also be good paired with something fancier, like quinoa or couscous.
Non-Salmonella Tomatoes
Hi Allison! I had to post again, if only to tell you about a recent trip to the bookstore, where I saw this lovely journal in the blank paper section. It's true, we can never escape the Pre-Raphaelites! I'm sure the irony of this journal doesn't escape you... since the Lady of Shalott's destiny is to float down the river to Camelot... and die... yeah, whoever made this journal probably didn't think about that.
ANYWAY. That wasn't the only thing I found at the bookstore. I also found something marvelous and exciting, something I actually purchased. None other than Lynne Rossetto Kasper and Sally Swift's new cookbook, The Splendid Table's How to Eat Supper. Can I just tell you how much I love this book? It's not only full of tempting-looking recipes, but also little tidbits of food knowledge and new techniques... for example, there's a section on how to teach yourself to cook without measuring spoons. Although this isn't a totally vegetarian cookbook, there is a big section of vegetarian entrees, plus lots of good-looking side dishes, salads, desserts and pasta dishes.
The first meal I tried was pesto risotto and tomato salad. The risotto was good, although it would have been better if I had been able to find fresh basil. I ended up using freeze-dried basil which was kind of like space food... and tasted a little bit like it. Luckily the onions and parmesan cheese compensated for that.
The outstanding part of the meal was this tomato salad. I made this before everyone in the country was convinced that tomatoes were carriers of disease--so I made it with plain old grocery store tomatoes, not even organic, definitely not ripe-on-the-vine. And it was still SO GOOD. I imagine that if you make this salad with actual good tomatoes it would be amazingly, unbelievably good. And I don't even like tomatoes.
Big Tomato Sweet-Sour Salad
(From The Splendid Table's How To Eat Supper by Lynne Rossetto Kasper and Sally Swift)
Ingredients:
Dressing:
1 cup cider vinegar
1/2 cup extra-virgin olive oil
1 med red onion, thin sliced lengthwise into long strips
salt and fresh-ground black pepper
8 large garlic cloves, thinly sliced
2 tight-packed tablespoons brown sugar
Tomatoes:
4 or so big ripe tomatoes (non-salmonella-ridden preferable)
Finish:
1/2 cup light-packed coarse-chopped fresh dill leaves
Make That Salad!
1. To make the dressing, first pour the vinegar into a small sauce-pan and boil it down to about 1/2 cup, about 5 minutes, set aside.
2. In a 10-inch skillet set over medium heat, warm the olive oil. Stir in the onion, sprinkling it with a little salt and a generous amount of pepper. Saute for a minute, or until the onion is softened but not browned. Stir in the garlic and cook for another 30 seconds to one minute. You want to soften the garlic but not brown it. Pull the skillet off the heat and blend in the brown sugar to melt it. (You can set the dressing aside at this point for several hours, or refrigerate it it for up to a week)
3. Put the tomatoes into a large serving bowl. When you are ready to serve, warm up the onion mixture if needed--it should be warm, not hot. Pull the pan off the heat, and stir in the boiled-down vinegar and any liquid from the tomatoes. Carefully (the dressing could be quite hot) taste for seasoning and sweet-tart balance. Pour it under the tomatoes, folding in the dill.
4. Serve, warm or room temp. I ate this over romaine lettuce and it was delicious!
NOTE: According to the recipe, this can be made with bacon fat instead of olive oil but, for obvious ideology-related reasons, I wouldn't recommend that.
Friday, June 13, 2008
Summer in Oklahoma
Hi Allison! I hope you're holding it together in Iowa City--every time I listen to the news I hear more dire reports about the flooding all over Iowa, and I worry about my Under Water Iowan friends. Oklahoma is rainy and grey, but far from being flooded--and, since I live at the top of a hill, I don't think I have too much to worry about.
Anyhow, I thought it might be nice to cast our minds back to the beginning of the summer, when (here, at least) it was sunny and gorgeous everyday, and things were in bloom.
One of my favorite things about coming home for the summer is making the drive from still-chilly-in-May Iowa to the hotbox that is Tulsa, Oklahoma. My mother's garden was flourishing, the air buzzed with insects and humidity, and I was happy, happy, happy.
We have raised-bed vegetable gardens in our backyard--this tomato teepee hasn't yielded any edible fruit yet, but there are a few little green tomatoes struggling to grow--I say struggling, because we haven't exactly been attentive farmers around here.
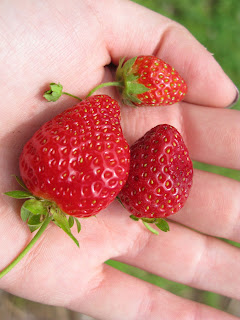
My strawberry patch is doing well, though! Okay, not SO well... mainly because I'm too lazy to go harvest the fruit, so it all gets eaten by the rabbits, possums, armadillos and raccoons that inhabit our backyard and live under our deck. Those three strawberries were rescued before the wildlife could get to them, and man, were they delicious. It made me think of eating Amanda's strawberries and taking video of our strawberry-tasting experience. Like all home-grown strawberries, these seemed to be a million times sweeter, tarter, and sourer than strawberries you buy at the store.
Okay, now to the food part of this entry! I don't exactly have a recipe for you today, more like a suggestion. And that suggestion is: make ye some salads! For me, the quintessential summer food is a cold prepared salad, pulled out of the refrigerator whenever dinner happens. Salads are great for the summer because once they're in the fridge, they require no forethought whatsoever.
This was my dad's birthday dinner... a veggie dog, some cold cantaloupe, potato salad, macaroni salad, and pea salad. In all fairness, I should admit that I cooked exactly none of this... it was all my aunt's doing.
I think my favorite was this pea-and-egg salad. It doesn't require a recipe... just mix together some defrosted peas, chopped hard-boiled eggs, cheddar cheese, red onion, bell pepper, chopped cucumber, salt, pepper and mayonnaise. Another great thing about salads: the proportions are all to taste, so you can customize them to your heart's content.
A more real entry is coming soon, but for now I've gotta go help with dinner! This eating thing, it never ends, let me tell you.
Sunday, June 1, 2008
21st Century Sack Lunches
Hey Kathryn,
I get really bored easily with sandwiches, so I like to take leftovers in tupperware containers. There are certain dishes that are good to take along, like this tofu and shiitake mushroom stir fry. It is filling and has a pleasant aroma. I once made the mistake of packing a raddish salad, which made the entire music hallway smell like an Iowan corn field after a seeding of manure. I'm not sure if my friends I was eating with at the time have forgiven me.
Sorry that it has taken me so long to post. Like any true-blooded Grinnellian, I would like to take this opportunity to say that I have indeed been thoroughly busy, what with attending weddings, starting a new job at the Iowa Children's Museum, and hanging out with the 34254341234 people who decided to camp out in Iowa City this summer. It's been fun.
It's also bizarre how much living at home makes me feel like I am in high school again. I think it's the fact that my mom does my laundry now, and I am now spending all of my time at the Coral Ridge Mall, which is both where the Children's Museum is located and where I used shop to try to find clothes to fit in with the cool kids.
I have also resumed one of my high school rituals, packing a lunch. In high school, it was a necessity because the food at the cafeteria was pretty gross and not good for being a vegetarian. Now, at the mall, I have slightly more options for food at the food court, but I often only have fifteen minutes to eat a meal during my break. Plus, I get to take along this sweet lunch box. Oh yeah, it's from one of my mom's Pathology Conferences.
I get really bored easily with sandwiches, so I like to take leftovers in tupperware containers. There are certain dishes that are good to take along, like this tofu and shiitake mushroom stir fry. It is filling and has a pleasant aroma. I once made the mistake of packing a raddish salad, which made the entire music hallway smell like an Iowan corn field after a seeding of manure. I'm not sure if my friends I was eating with at the time have forgiven me.
Tofu and Shiitake Mushroom Stir Fry
Adopted from Mark Bittman's How To Cook Everything Vegetarian
Ingredients:
1 lb firm tofu
3 tbsp vegetable oil
1 onion, chopped
1 bell pepper chopped
1/2 lb shiitake mushrooms, chopped
1 tbsp crushed garlic
1 chopped, peeled fresh ginger
1 cup sake
2 tbsp. plus more to taste of soy sauce
1/4 cup chopped scallions or spring garlic
Directions:
Drain tofu by wrapping it in paper towels and by placing a plate on top of it for a couple of minutes. Then, cut the tofu into 1/2 inch cubes and set aside.
To a hot wok or a large sauté pan, add 1 tbsp of the oil and the onions. When the onions begin to get soft, add the bell pepper and cook for about five minutes. Remove with a slotted spoon and set aside. Add another tbsp of oil and add the mushrooms. Sauté until they are cooked through. Remove them as well and set aside. Add the rest of the oil, the garlic and ginger to the pan and cook for thirty seconds. Add in the tofu and wait for it brown. Add the wine and 2 tbsp of soy sauce to the pan and wait for it to reduce to about half it's volume. Add in the pepper, mushroom, onion mixture and cook for another minute. Add the scallions and soy sauce to taste and serve immediately.
Happy cooking and I can't wait to hear about your summer.
Love,
Allison
Saturday, May 17, 2008
A Summery Pie!
I love it when summer comes to Grinnell--because it brings the last few weeks of classes, which are inevitably filled with concerts, final presentations, and general jubilation.
My friend Ali curated a final show as part of her internship at the gallery on campus, and afterwards she hosted a super-fun potluck at John's apartment. There were cold salads, popsicles, fondue, an entire pack of Andes mints... basically, all that is good in the world. I brought this great pie, which I made without any sort of measuring implements (because I didn't have any!). The trials of cooking in a dorm kitchen are manifest.
Peach Pie with Coconut-Almond Topping
Adapted from this recipe by Ken Haedrich
Ingredients:
2 Frozen Pie Crusts
FILLING:
Two 1-lb. bags frozen sliced peaches, partially thawed.
The juice of one lemon.
About a third cup of sugar
About 2 tbsp. cornstarch
1/2 tsp vanilla extract
1/4 tsp ground nutmeg
TOPPING:
About a cup of flour
About 2/3 c. sugar
a little salt
1/2 c. sliced almonds
1/2 c. sweetened flaked coconut
6 tbsp. cold unsalted butter
WHAT TO DO:
1. Preheat oven to 400 degrees farenheit.
2. Combine the peaches and lemon juice in a big bowl, with 1/3 c. of sugar. In a small bowl, mix the cornstarch with the remaining sugar. Sprinkle this mixture over the fruit, then stir in the vanilla and nutmeg and mix everything together.
3. Divide the fruit filling between the two crusts, and bake for 35 min.
4. Meanwhile, make the topping: Mix everything together (you can use a food processor if you want a real crumb-like topping, but I didn't have a food processor so I just cut the butter into the dry ingredients, then mashed everything together with my hands until it was sort of crumb-like).
5. After 35 min, take out the pies and divide the topping between the two pies, pressing it lightly down into the fruit and juice. Reduce heat to 375 and bake until the peach juice bubbles thickly around the edges, about 30 minutes.
Seriously, these pies were delicious in a really intriguing, this-is-like-pie-but-not-quite kind of way. We ate one and a half pies at the potluck, then later we ate what was left in the campus grill, all eating directly out of the pie plate with plastic forks that we swiped from the condiment and utensil area. In short, it was amazing.
Saturday, April 5, 2008
Some day, my spring will come
Hey Kathryn,
I don't know when this winter will end! This Thursday, it snowed in Grinnell, and it was not a smattering, but a full two inches, which came down during my Museum Studies Class. No siree, I am not ready to get rid of my winter coat, my boots, my down comforter, or my supply of canned food.
So when this nasty weather hit, my first instinct was to make a soup - I know, how cliché. But this soup is really easy to make, makes use of common pantry items, and tastes just like this Tuscan Tomato Soup that is served at one of the best soup places in Iowa City called the Bread Garden. I swear, you will never need to eat another can of Campbell's tomato soup after eating this, well, unless you are having an Andy Warhol party.
Mmm Mmmm Better Tomato Soup
Adapted from Deborah Madison's Creamy Tomato Soup
Ingredients:
1 1/2 tbsp butter
1/2 onion, roughly chopped
4 cloves of garlic chopped in half
1/4 tsp dried basil
1 1/2 tablespoons flour
1 can of diced tomatoes
1 cup vegetable broth
3/4 - 1 cup milk
Buttermilk
Sauté the butter, chopped onions, garlic in a pot on medium heat until onions are soft and fragrant (about 3-5 minutes). Add the basil and salt and pepper to taste, and then add in the flour. Stir the mixture around, and watch for the flour to toast up and turn brown. Slowly add in the vegetable broth and tomatoes, and cook until just about ready to serve. Blend the soup with an immersion blender, and pour in the milk off the heat. Pour into bowls and finish with a dash of buttermilk or if you prefer sour cream.
Look - the buttermilk makes cool tadpoles in the soup.
So, stay warm Kathryn, and maybe, just maybe, spring will arrive!
Love,
Allison
Monday, March 31, 2008
Yum, Fake Bacon!
Hi Allison!
Lately, I've been craving something expressly forbidden... a delicious sandwich oozing with mayonnaise and topped with crunchy bacon, crisp lettuce, and juicy tomatoes. I know Veggie bacon is hardly a substitute for the real thing but, since it's the only thing I'm permitted, I decided to give it a try.
The following sandwich was constructed in the kitchen of our rental house on the beach in Port Aransas, Texas, where I spent a week over spring break hanging out with my parents, reading,
The exciting part of this cooking experiment was making the homemade mayonnaise recipe featured in Molly's column in this month's Bon Appetit!
I won't reproduce the recipe here since I've linked to it, but I felt very old-fashioned and adventurous as I slowly whisked the mayonnaise together and emulsified the the oil.
My mayonnaise came out a little runny, but very delicious!
Next step: Fake Bacon! I cooked my bacon on the stove top in a little oil over medium heat. I think it would probably be just as successful, and easier, to do this step in the microwave, but I wanted to feel authentic.
Vegetarian bacon is not so appetizing before it's cooked (notice the ice crystals clinging to the strips of vaguely bacon-patterned soy):
Once the bacon was nice and crispy, it was time to assemble the sandwich. I used toasted oatmeal bread as a base, and added spinach, thick tomato slices, my homemade mayonnaise, and the warm and crispy fake bacon:
We at these sandwiches with sweet potato strips that had been roasted in the oven at 400 for about 30 minutes, after being coated in olive oil, salt & pepper. All in all, this was a delicious meal. Luckily the photos of it were recoverable from my camera's memory card after I dropped my entire camera into the Gulf of Mexico!
Bon Appetit!
Monday, March 24, 2008
Tradition
Hey Kathryn,
I hope that your spring break is going well - I heard about how you lost your camera in the Gulf of Mexico, and I'm really sorry for your loss. I recently looked through a children's book, which is illustrated by David Wiesner called Flotsam. Wiesner, who also illustrated Tuesday, imagines the life of a camera after it was lost in the ocean, snapping pictures of undersea life and passing from beach-goer to beach-goer throughout the years. I only hope that your camera can have such a future.
It came out looking the same as my other challahs and had my trademark sweet, dessert like taste, but it definitely wasn't my best challah. The dough took a long time to rise, which made me anxious to have it bake up as quickly as possible. I set the oven for 350 degrees, and let it bake for around an hour. However, I forgot to account for my grandmother's dark metal pans. I had cooked it for too long; the bottom of the challah burned, and the inside was dry. My family was really nice and still complimented my bread, but throughout the meal, I kept singing in my head: "If I could turn back time." Anyways, here is the recipe, and I wish all of you the best of luck if you try to make it.
I hope that your spring break is going well - I heard about how you lost your camera in the Gulf of Mexico, and I'm really sorry for your loss. I recently looked through a children's book, which is illustrated by David Wiesner called Flotsam. Wiesner, who also illustrated Tuesday, imagines the life of a camera after it was lost in the ocean, snapping pictures of undersea life and passing from beach-goer to beach-goer throughout the years. I only hope that your camera can have such a future.
My spring break travels took a less exotic turn. I spent the week visiting my relatives who live in the east coast. We spent one day at my grandmother's house in Philadelphia, where I embarked on my first major cooking project since the Cowboy Cookies. Seeing as it was Shabbat, I wanted to impress my relatives and make them my challah. For those of you who have never had challah, it is a braided egg bread that opens the Shabbat meal, and one of the only things that my family of vegetable-averse, flavor-averse, and meat-averse people can eat together. My cousin Sarah before I even set foot inside a kitchen expressed extreme doubt: "Why are you even going to make challah? Homemade ones taste too much like yeast." Oh Sarah, you really don't know what it's like to be a Jew roughing it in the Heartland. She probably has never had to deal with not being able to buy challah on Friday. Learning to make a good challah in Iowa is more than a traditional gesture - it's a necessity. In Grinnell, I learned how to make it with the help of Deborah Kaiser, and since then I have adapted her recipe and made it even sweeter. Like a good medium rare steak, I undercook the bread so that it is still doughy and gooey in the center. I am very proud of my challah recipe, and I thought it would be easy to prove Sarah wrong.
It came out looking the same as my other challahs and had my trademark sweet, dessert like taste, but it definitely wasn't my best challah. The dough took a long time to rise, which made me anxious to have it bake up as quickly as possible. I set the oven for 350 degrees, and let it bake for around an hour. However, I forgot to account for my grandmother's dark metal pans. I had cooked it for too long; the bottom of the challah burned, and the inside was dry. My family was really nice and still complimented my bread, but throughout the meal, I kept singing in my head: "If I could turn back time." Anyways, here is the recipe, and I wish all of you the best of luck if you try to make it.
Sweet-as-Babkah Challah
Ingredients
5 tsp yeast (or two packets worth) of active dry yeast
1 1/2 cups warm water
1 cup plus 1 tbsp sugar
1 cup oil
5 eggs plus
1 tsp of salt
7-8 cups all purpose flour
1 1/2 cups warm water
1 cup plus 1 tbsp sugar
1 cup oil
5 eggs plus
1 tsp of salt
7-8 cups all purpose flour
Add 1 tbsp of sugar, the yeast, and the warm water in a large bowl, stir to dissolve the yeast and let stand until a tan layer of foam appears on the top. Add the rest of the sugar, 4 of the eggs, the salt, the oil, to the bowl and mix until well combined. Start adding the flour, one cup at a time, and once it becomes to hard to stir, lightly flour your countertop or cooking surface, and knead the dough while also adding in more flour until the dough is no longer sticks to the countertop or to your hands. Wash and lightly oil the bowl, and place dough in the bowl covered with a damp dish cloth. Set aside for a couple hours until the dough has risen to at least double its original volume. If the dough is not rising properly, warm up the oven for a minute, and then place the bowl in the oven and continue to let it rise. Once it has risen, punch the down so that all the air bubbles deflate, and divide the dough in half, and then each half into three strands. Preheat the oven to 325 degrees. Braid the two loaves, and set on a pan. Beat the egg with a tablespoon of water in a small bowl. Brush the challah with the egg wash, and place in the pans in the oven to bake for 40 minutes to an hour, or until the bread is golden brown.
Serve after saying the Hamotzi, like the good Jew in all of you.
Possible add-ins for adventurous eaters:
- raisins
- nuts
- chocolate chips
- shredded coconut
- M&Ms
Anyways, Kathryn, good luck with all your spring break cooking endeavors. I look forward to posting about successful cooking experiments in the next couple of days.
Cheers,
Allison
Tuesday, March 4, 2008
Everybody's Gonna Love Today
Hey Kathryn,
I'm sending you and our readers all of my love, especially in light of the tragic events that have happened this past week. Two Sundays ago, a Grinnell student had her dorm space vandalized and graffitied with homophobic slurs. After the campus rallied together in solidarity against forces of intolerance, a second incident occurred in which 34 students who are active in the queer community received anonymous hate mail in their campus mail. I am saddened and incredulous that such outrageous demonstrations of bigotry happened on this campus, which prides itself on being a progressive and accepting community.
In spite of these awful things, this weekend was surprisingly restorative and filled with inspirational Amanda Bynes movies, love mail, a visit from Meredith, a raucous game of flippy cup, and of course, cooking. Meredith and I set off to make something comforting, and we settled on a rather humble recipe for Cowboy Cookies. These were rustic but toothsome chocolate chip oatmeal cookies, a perfect mixture of resolve and hope.
Cowboy Cookies For the Grinnell Soul
-adapted from Cowboy Cookies III on allrecipes.com
Ingredients
1 3/4 c. flour
1 tsp. baking powder
1 tsp. baking soda
1 c. butter
2 eggs
1 c. granulated sugar
1 c. brown sugar
2 1/4 c. oatmeal
1 c. chocolate chip cookies
Directions:
Preheat oven to 350 degrees, and grease a baking sheet. Sift dry ingredients into a medium sized bowl. Cream together butter and eggs, add in both sugars, and then the dry ingredients. Stir in oatmeal and chocolate chips just until combined. Scoop out tablespoon sized balls of dough and place on cookie sheet. Bake for 12-20 minutes, or until light golden brown.
Making these cookies was a true exercise in Grinnell ingenuity and charity. Meredith and I forgot to buy butter at the store. Emily happened to have a stick of butter left over from a baking project in her dorm, and we exchanged her stick of butter for the use of our remaining eggs. We stole 17 butter packets from dining hall for the remaining half cup of butter. We definitely had enough to make our cookies:
Voila, homemade cookies:
I definitely reconnected to the Grinnell community by making these cookies and sharing them with Grinnellians. Forces of divisiveness and hatred definitely don't stand a chance against these cookies or my friends. Thanks Grinnell - I love you all the more.
XOXO,
Allison
I'm sending you and our readers all of my love, especially in light of the tragic events that have happened this past week. Two Sundays ago, a Grinnell student had her dorm space vandalized and graffitied with homophobic slurs. After the campus rallied together in solidarity against forces of intolerance, a second incident occurred in which 34 students who are active in the queer community received anonymous hate mail in their campus mail. I am saddened and incredulous that such outrageous demonstrations of bigotry happened on this campus, which prides itself on being a progressive and accepting community.
In spite of these awful things, this weekend was surprisingly restorative and filled with inspirational Amanda Bynes movies, love mail, a visit from Meredith, a raucous game of flippy cup, and of course, cooking. Meredith and I set off to make something comforting, and we settled on a rather humble recipe for Cowboy Cookies. These were rustic but toothsome chocolate chip oatmeal cookies, a perfect mixture of resolve and hope.
Cowboy Cookies For the Grinnell Soul
-adapted from Cowboy Cookies III on allrecipes.com
Ingredients
1 3/4 c. flour
1 tsp. baking powder
1 tsp. baking soda
1 c. butter
2 eggs
1 c. granulated sugar
1 c. brown sugar
2 1/4 c. oatmeal
1 c. chocolate chip cookies
Directions:
Preheat oven to 350 degrees, and grease a baking sheet. Sift dry ingredients into a medium sized bowl. Cream together butter and eggs, add in both sugars, and then the dry ingredients. Stir in oatmeal and chocolate chips just until combined. Scoop out tablespoon sized balls of dough and place on cookie sheet. Bake for 12-20 minutes, or until light golden brown.
Making these cookies was a true exercise in Grinnell ingenuity and charity. Meredith and I forgot to buy butter at the store. Emily happened to have a stick of butter left over from a baking project in her dorm, and we exchanged her stick of butter for the use of our remaining eggs. We stole 17 butter packets from dining hall for the remaining half cup of butter. We definitely had enough to make our cookies:
Voila, homemade cookies:
I definitely reconnected to the Grinnell community by making these cookies and sharing them with Grinnellians. Forces of divisiveness and hatred definitely don't stand a chance against these cookies or my friends. Thanks Grinnell - I love you all the more.
XOXO,
Allison
Sunday, February 17, 2008
Semi-Homemade and Semi-Vegan
Imagine: You get an email telling you to rendezvous at a specific time with a mysterious stranger. You show up, enter a room pulsing with bad dance music and twenty-year-old anxiety, and approach a table staffed by harried students. They introduce you to your mystery date... and then handcuff you together. At Grinnell, this is how Valentine's Day is celebrated: with a dance called "Chains," where your friends can anonymously set you up with your true love match... or with a total stranger.
Allison and I thought, what better way to pre-party for Chains than with a small soirée for a few of our closest friends? Because we're super-busy, but also creative and charming, we decided to throw a 1950s-kitsch-themed party using almost exclusively pre-prepared and processed foods. Delicious! Or at least fast.
Our menu was:
strawberry and chocolate cupcakes with semi-vegan buttercream frosting
Lipton's onion dip
Sour cream salsa dip
assorted chips
almond-covered cheese ball with Ritz crackers
reduced-to-clear Valentine's Day candy
punch with sherbet and strawberries
Unfortunately, the spread disappeared before we could get good photos of the food. But you can see from this photo of the carnage that the party was a success - thanks Bryan for the fabulously composed pictures.
Classy! We even had requests for the cheese ball recipe. So, here it is!
Awesome Cheese Ball
(Adapted from the "Heavyset Cheese Ball" in I Like You: Hospitality Under the Influence by Amy Sedaris)
Ingredients:
8 oz pkg of cream cheese
1/2 c REAL Mayonnaise
salt
pepper
dried dill weed
garlic powder
3 tbs coarse grain mustard
1/2 c whole natural almonds, roasted in the oven
Directions:
Cream together the cream cheese and Mayonnaise. Season with spices to your taste, mix in the mustard, and refrigerate the whole concoction for a few hours. When it has become more firm, form it into a log-like shape on a plate, and cover it with the almonds, which should be arranged to evoke the idea of a pinecone. Don't ask me why.
The other major home-made success was our buttercream frosting, which we have decided, because it involved soymilk, is almost vegan.
Semi-Vegan Frosting
Ingredients:
2 sticks of butter (no, really)
A whole bunch of powdered sugar (probably five or six cups)
1/4 cup or so of soymilk (add more to achieve spreadability)
food coloring optional
Directions:
Cream the butter in a large mixing bowl with a spoon. Once it's soft, add about a quarter of the powdered sugar and a splash of soymilk, mixing everything together to create delicious frosting. Keep adding the powdered sugar and soymilk alternately until all the powdered sugar has been used. Feel free to personalize this recipe by tinting the frosting hot pink (like we did!), or any other appropriate color.
So, if you want to throw a fabulous party, the main ingredients are:
Delicious unhealthy food
The soundtrack to American Graffiti
"Apples to Apples"
Festively attired guests
Until next time, remember:
Keep it simple, keep it kitschy, and always semi-homemade!
These scones are delightful!
Let me tell you, Allison, my winter break wasn't very eventful. Mostly I sat around agonizing about my future for hours on end. Or watching Project Runway. Anyway, there were a few bright points to my vacation, one of which was a delightful tea party I went to at a friend's house. In honor of merry old England (from which I had just returned), I decided to make scones! But I made cranberry orange scones, which is kind of a fake American scone variety.
They were delicious! We ate them with clotted cream and Barefoot Contessa brand strawberry jam!
As you can see, there was quite a lavish spread--we also had custard tarts with an edible flower and raspberry garnish, fancy imported cookies, cucumber and salmon finger sandwiches, two kinds of tea, and plenty of ambiance. Most importantly, we had the necessary nourishment to sustain us through an epic gossiping situation.
Because really, what's the point of coming home from college if not to gossip about every single person you went to high school with? And with the help of Facebook, nobody can keep any secrets.
Scrumptious Cranberry-Orange Scones
(From Baking Illustrated: A Best Recipe Classic by the editors of Cook's Illustrated Magazine. I love this book because it has great diagrams and very clear directions for every basic baked item you could possibly think of)
Ingredients
2 c. unbleached all-purpose flour
1 tbs baking powder
3 tbs sugar
1/2 tsp salt
5 tbs cold unsalted butter, cut into 1/4 cubes
1 tsp grated orange zest
3/4 c dried cranberries
1 c heavy cream
Preheat oven to 425.
Place four, baking powder, sugar and salt in a large bowl, or the work bowl of a food processor fitted with a metal blade. Whisk together or process with six one second pulses.
(I used the food-processor method, and it worked perfectly)
If making by hand use two knives, a pastry blender, or your fingertips and quickly cut in the butter until the mixture resembles coarse meal with a few slightly larger butter lumps. If using the food processor, remove the cover and distribute the butter evenly over the dry ingredients. Cover and process with twelve one-second pulses.
(At this point, the mixture should resemble coarse, wet sand)
Add the currants and quickly mix in or pulse one more time. transfer the dough to a large bowl.
Stir in heavy cream with a rubber spatula or fork until the dough begins to form, about 30 seconds. Transfer the dough and all dry flour bits to a counter top and knead the dough by hand just until it comes together into a rough, slightly sticky ball, five to ten seconds.
Cut the scones into eight wedges. (There's a secret, special technique for getting the wedges perfect: press the dough into a lightly greased or buttered 8" round cake pan, then invert the pan on a plate or cutting surface. Presto--a perfect circle of dough to cut with a sharp knife)
Place the wedges on an un-greased baking sheet. Bake until the scone tops are light brown, 12-15 in. Cool on a wire rack.
Eat with clotted cream, God's gift to mankind. And of course plenty of jam!
Cheers,
Kathryn
Saturday, January 19, 2008
The Wonders of Glutinous Rice Balls
Dear Kathryn,
It is a little strange that it has taken me so long to write about my favorite food category of all time, which, drumroll please, happens to be the humble legume. Oh, beans! They are Bon marché (French for dirt cheap), Earthy, Adaptable to many recipes, Nutricious, and Sinfully silky. True to their adaptability, beans can even be for dessert. A couple days ago, Alison had me over for a tea party, and we prepared some Glutinous Rice Balls with Red Bean Filling that she had purchased at one of our three chinese grocery stores in town (god bless Iowa City for being one of the more diverse cities in Iowa.) The package indicated that within 6-8 minutes, we would have a "delicious and convenient" dessert ready for us to eat.
I was a little skeptical. I had tried moon cakes once at a friend's sleepover in seventh grade, and while I appreciated her mother having made these especially for us to eat, I did not like the bean paste filling. I was too embarassed to admit that I didn't like it, so I stashed it in my pocket, waited until everyone had fallen asleep, and then discarded it underneath the couch. Christine, if you are reading this, I must send you my very long overdue apologies for any inconveniences (ant, mold, rat infestations?) that I might have inadvertently caused.
Well, I decided to give bean desserts another try, and this time, I did not have to craft an elaborate scheme to discard them. In fact, they were quite tasty despite their exploding-larvae like appearance. The shell was soft and gummy, and yielding to the rich and lightly sweetened rice bean filling. They were even better dipped in sesame seeds.
These glutinous rice balls definitely packed a punch - after eating a couple of them, Alison and I felt a little more than full. However, it is impossible to feel guilty by overindulging in these healthful desserts. If there ever was such a thing as a superfood, I think these would have to be it.
It is way too late for me to continue waxing poetic about glutinous rice balls - good night.
Thursday, January 10, 2008
Smoothies: The Secret to a Healthy and Glamorous New Year
Kathryn, I must confess that I've had a hard time keeping my new resolutions. It's pathetic that I've reigned in the New Year for only 11 days, and I have yet to transform myself into a healthy and glamorous Allison. However, I found this clip from Brenda Dickinson, a daytime television sensation from the 80s, and in it she reveals her time honored secrets to how she looks fabulous. So, slap on your spandex, tease your hair, slurp your protein shake, and check it.
Wow, if only I had her clothes. While I dig Brenda's style and admire her commitment to a rabbit diet and militant exercise regime, I find her smoothie preparation quite objectionable. A banana, juice, and some protein powder do not a satisfying smoothie make. I have included this updated version, complete with all natural ingredients, fruit, and above all, protein - yum.
Rock Your Way Into a Leotard Smoothie,
Ingredients:
- 1 pear, peeled and diced
- 1/4 cup milk
- 2 tbsp yogurt
- 2 tbsp pear butter
- 1/4 tsp ground ginger
Did you notice the pear butter from the Borough Market, our foodie Oasis in London? I only wish I had smuggled more back to Iowa.
Best of all with this recipe, I got to use the trusty immersion blender. It makes me feel powerful, and even dare I say, quite chic. Heck, I think I am finally about to embark on a glamorous new year.
Grinnell in 10 days. Wow... I'm excited to see you, but I must admit that I am a little nervous that school is about to start. Enjoy the rest of your break!
Friday, January 4, 2008
Happy 2008! Celebrate With Kale!
Happy New Year! I would share my resolutions with you, except that this year I didn't so much make resolutions as draft a 32-point strategic plan directing all facets of my life in the coming year. Perfectionist? Me? Never!
My New Year's Eve plans have been the same my entire life: hang out with my parents, watch the ball drop in Time's Square, and at midnight go in the front yard and make a lot of noise and shout "Happy New Year!" Everything in my life is very ritualized.
Tradition can be good, though--especially culinary tradition. It's a Southern superstition to eats black-eyed peas and greens at New Year's, to ensure prosperity in the year to come. Actually, I'm not sure how widespread this tradition is--it could very well happen everywhere. Anyway, on New Year's Day I went to my aunt's house and had a feast of ham (well I didn't eat the ham), black-eyed peas, sweet potatoes, corn, and a delicious made-from scratch key lime pie (that was my contribution). On New Year's Eve, however, I stayed in and prepared a miniature feast of kale and black-eyed peas, and a butternut squash gratin recipe from Deborah Madison's legendary book, Vegetarian Cooking for Everyone.
I think you're really going to like this meal, Allison, since it stars your favorite vegetable (well, aside from fennel) -- Kale!
Deborah says greens can harbor grit, so after you cut them away from the stem, you should immerse them in water, agitate them, and allow the grit to sink to the bottom of the bow.
Butternut Squash Gratin (I actually used Acorn squash)
1/4 c. olive oil
4 c. thinly sliced onion
4 thyme sprigs
2 tablespoons chopped sage or 2 teaspoons dried
NOTE: I didn't have sage on hand, so I replaced it with a random assortment of other autumnal-sounding spices from the spice cabinet.
Salt and freshly milled pepper
6 c. butternut squash, peeled and cut into 1/2 inch cubes
1/2 c. flour
2 tablespoons chopped parsley
1/2 c. grated Gruyere or Fontina
1/2 c. plus 2 tablespoons heated whole milk
(I used half and half, since I'm always looking out for ways to make my cooking less healthy).
1 c. fresh breadcrumbs
(I made these by pulsing some stale whole-grain bread in the food processor)
Preheat the oven to 350 F. Lightly oil or butter a 2-quart gratin dish (this means a sort of deep-ish, bowl-shaped casserole dish, I'm pretty sure!)
Heat half the oil in a skillet over medium heat. Add the onion, thyme, and sage and cook, stirring frequently, until the onions are lightly caramelized, about 15 minutes. Season with 1/2 teaspoon salt and pepper to taste. Spread in the gratin dish, return the skillet to medium heat, and add the remaining oil.
Toss the squash in the flour, letting the excess fall away. Add it to the pan and cook until it begins to brown in places on both sides, about 7 minutes. Add the parsley, season with salt and plenty of pepper, and cook for 1 minute more. Layer the squash over the onions, cover with the cheese, then add the milk. Cover and bake for 25 minutes, then uncover, add the bread crumbs, and bake until the top is browned and the liquid absorbed, about 25 minutes more.
Oooooh. Aaaaah. Yum!
Now for the beans 'n greens! This is loosely adapted from another of Deborah Madison's recipes. Excep0t that the recipe was for Tuscan beans and greens and this is, well, not.
Oklahoma Beans 'n' Greens
Ingredients:
Olive oil
A whole bunch of Kale (i.e. whatever you get from buying a bunch of it at the store), cleaned and chopped.
An onion, chopped
3 or 4 bulbs garlic, minced
1/2 a cup of red wine (although really, white would work better. We just happened to have some red on hand)
A can of black-eyed peas (about 15 oz, I'm too lazy to check!), drained and rinsed
Salt & Pepper
First, blanch the greens. Heat a large saucepan full of water over high heat, and when it starts to simmer, put in the kale and cover. Let cook for 6-7 minutes, until kale is bright green and tender, then drain.
In a largeish skillet, heat a couple of tablespoons of olive oil over medium heat. Add the onion and garlic and cook for about 5 minutes, until transparent. Add the wine, stir to mix, and let the alcohol cook off of the wine, until the mixture is syrupy and dark (or, just syrupy, if you use white wine). Add the beans and kale, mix it all together, and let it cook until it's nice and hot. Season to taste with salt and pepper. Bon Apetit!
The meal was warm and filling, and a nice way to ring in 2008. This would be good to eat on any cold winter night, since it tastes so homey and comforting.
I hope the first few days of 2008 have been nice for you, Allison (I'm sure they were the excitement of the Iowa caucuses!). Happy cooking, and I'll see you back in Grinnell in two weeks!
G.G. Cookies, for Christmas (or any time!)
Okay, so maybe I'm heinously late with this post about Christmas. The holiday (which, in our house, is a two-day affair that includes a seven-hour drive to St. Louis right in the middle of it), was a whirlwind. Also it was strangely anticlimactic, probably because my grandmother was in the hospital and all our preparations were kind of halfway completed at the last minute.
BUT, it all turned out well! We might not have put our decorations out until the last minute, and, yes, our tree might have been brittle with brown needles here and there because we bought it so late (and we may have only put up the few ornaments in our collection that the cat couldn't break) -- but in the end, none of that mattered.
We were still cozy and jolly:
And, a couple of days before Christmas, I still got to make G.G. Cookies -- the most important part of any holiday celebration. These are unbelievably delicious Christmas cookies that my great-grandmother (who we called G.G.) used to make for Christmas, Easter, birthdays, the Fourth of July... really any holiday with a color scheme that can be replicated in colored sugar. These are tiny, thin, crispy sugar cookies that are best eaten compulsively. The correct technique is to pop a cookie in your mouth whole, and kind of let it dissolve against the top of your mouth. Since G.G. died a few years ago (at the ripe old age of 97), I've made these in her stead. And now, since I'm divulging this super-secret (kind of) family recipe, you can too!
Of course, before I got down to the nitty-gritty of mixing up the cookies, I had to start my favorite Christmas movie, It's a Wonderful Life, playing. It just wouldn't be Christmas without Jimmy Stewart having a personal crisis while Donna Reed sings "Buffalo Gals" in a bathrobe!
Ingredients:
1 stick butter
1/4 c. oil (I used Wesson vegetable oil)
1/2 c. granulated sugar (I used extrafine baking sugar)
1/2 c. powdered sugar
1 egg
2 c. flour
1/2 tsp baking soda
1/2 tsp cream of tartar
1/2 tsp cinnamon
1 tsp vanilla
My great-grandmother was obsessively organized (sound familiar?) and she kept a typed index-card index of every book she'd ever read. She also gave me this recipe on one of her signature manual-typewriter typed unlined index cards:
First, cream the sugars, oil, and margarine. (I did this in an electric mixer with a paddle attachment). Add the egg.
In a separate bowl, sift together the flour, baking soda, cream of tartar and cinnamon together and add the dry ingredients a little at a time to the creamed mixture. Add vanilla.
The final dough is very pale and smooth:
Refrigerate dough in a covered container. (G.G.'s recipe says to do this overnight. Yeah, right. I refrigerated it for about 30 minutes because I'm horribly impatient)
Next, make small balls -- about 1/2 tsp - 1 tsp of dough. They should be about the size of a large marble, or slightly less than an inch in diameter.
Next, if you're mildly obsessive-compulsive like me, you line the dough balls up in neatly staggared lines on a large cookie sheet (buttered, sprayed with Pam, or otherwise made non-stick), so as to fit as many cookies as possible.
Get out a glass with a smooth bottom and fill a bowl with sugar.
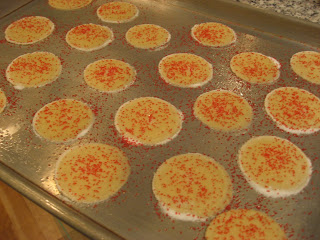
You're going to use the sugar-coated glass bottom to smash the dough balls into cookies! Now, you're not just slightly flattening them. You are smashing them utterly flat and thin, and then you're going to sprinkle them with festive colored sugar. I used red and green, but these can be adapted to any occasion by changing the colors.
Bake at 350 degrees for about 15 minutes. The long cooking time is essential, because it makes the cookies uniformly crispy and golden.
Aren't they beautiful! Make sure you let them cool for quite awhile, or they'll break when you try to remove them from the cookie sheet. Be careful, since they're quite delicate. And DELICIOUS.
Note: G.G. Cookies, though wonderful and amazing in every way, aren't safe for cats to consume!
Cheers Allison, and here's hoping that over winter break your cold cold heart has softened towards out feline friends.
Subscribe to:
Posts (Atom)